Short description
In the Returns module you stay on top of all customer returns from Amazon FBA — from announcement through processing to restocking or disposal. You create tasks (todos), upgrade defective items for reuse and analyze your return rate.Requirements
- Active Amazon SP-API connection
- Optional: linked solution provider for return processing
The three sections at a glance
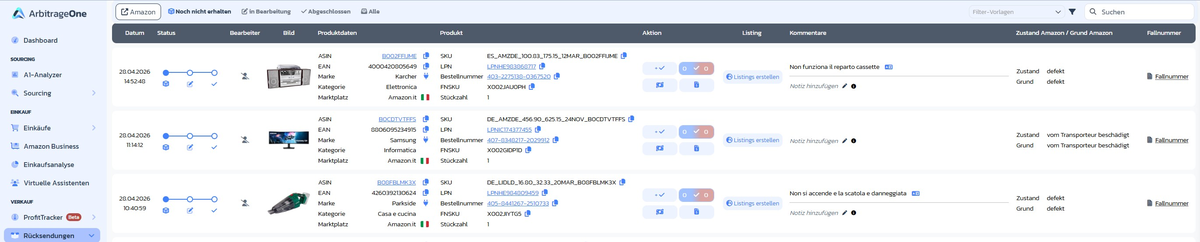
1. Returns
→ Open directly in the app: app.arbitrageone.de/returns/lpns List of all returns announced and received by Amazon. The tabs at the top filter:- Amazon — marketplace filter (shows only returns from this marketplace)
- Not yet received — announced but not yet at the warehouse
- In progress — received, waiting to be processed or in progress
- Completed — fully processed (upgraded, sent back or disposed)
- All — full history
- Date & status — 3-step progress (announced → received → processed)
- Handler — who processes the return (you or your solution provider, e.g. PrepZone)
- Image and product data (ASIN, EAN, brand, category, marketplace)
- Product (Seller SKU, LPN, order number, FNSKU, units)
- Action — quick buttons (✓ upgrade / 0 dispose)
- Listing — Create listings button for resellable items
- Comments — note with language badge (e.g. IT)
- Amazon condition / Amazon reason — e.g. defective, damaged by carrier
- Case number — Amazon case number (inline editable)
Handler avatar and “Repeated return” badge
In the status area the avatar shows you who’s responsible for the return. If the customer already returned the same SKU before, a yellow Repeated return badge appears as well — a typical warning sign for possible return fraud or a product issue.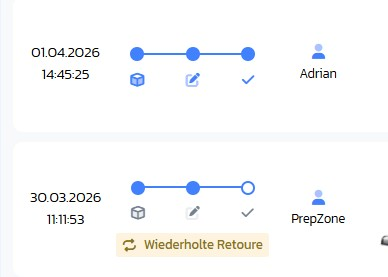
2. Returns todos
→ Open directly in the app: app.arbitrageone.de/returns/todos Here you manage concrete work steps for each return. Filter tabs: From you / For you / All / Archived. Per entry you see creation date, From/For, product, type, serial number, notes and status.
Create a task
Via Create task you open the modal with:- Type — Open Amazon case, Open warranty case, Send to seller, Send photos, Dispose, Other
- For — Service provider (your solution provider) or yourself
- Notes — free text for context / instructions
- Serial number — if relevant for warranty/complaint cases
- Mark as received — toggle, if the return has already arrived
- Select files or Start camera — attach photos directly

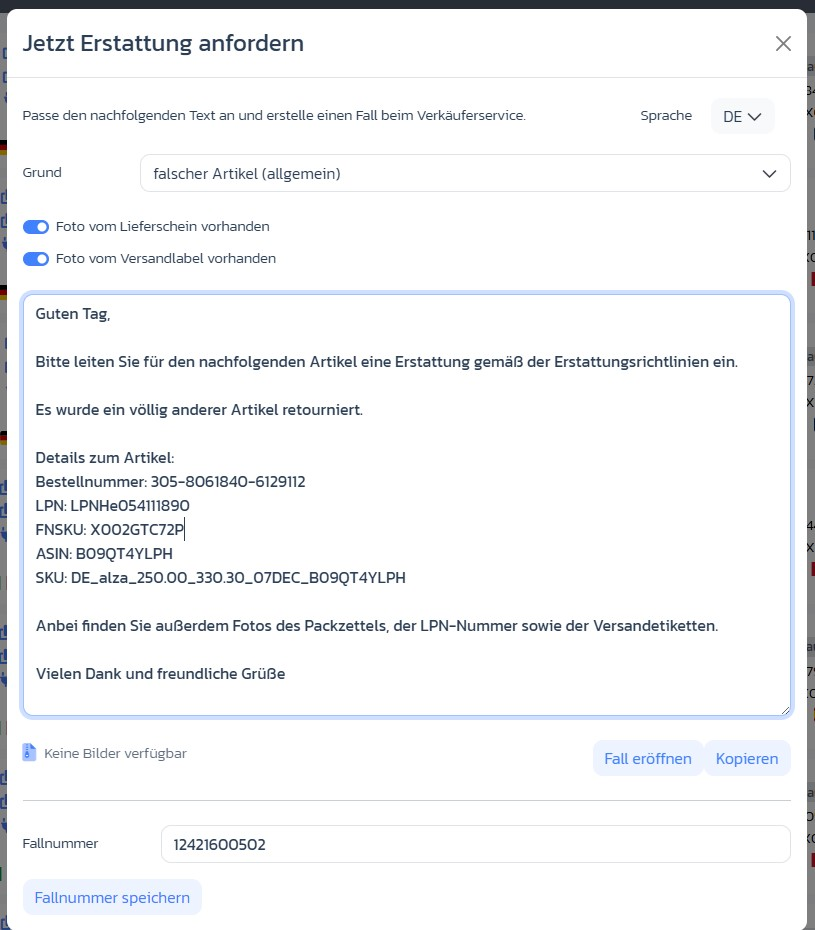
”Request reimbursement now” modal (Amazon case)
For todos of type Open Amazon case, a pre-written message opens automatically:- Reason — e.g. wrong item (general), defective, missing parts
- Photo toggles — Photo of packing slip available / Photo of shipping label available
- Language — DE / EN / FR / IT / ES (adapts the message)
- Message — pre-filled with order number, LPN, FNSKU, ASIN, SKU
- Buttons Open case (to Amazon) and Copy
- Field Case number + Save case number for later documentation
Notes directly in the table
You maintain notes inline per return via Add note (pencil icon). The ℹ button shows the history of existing notes.
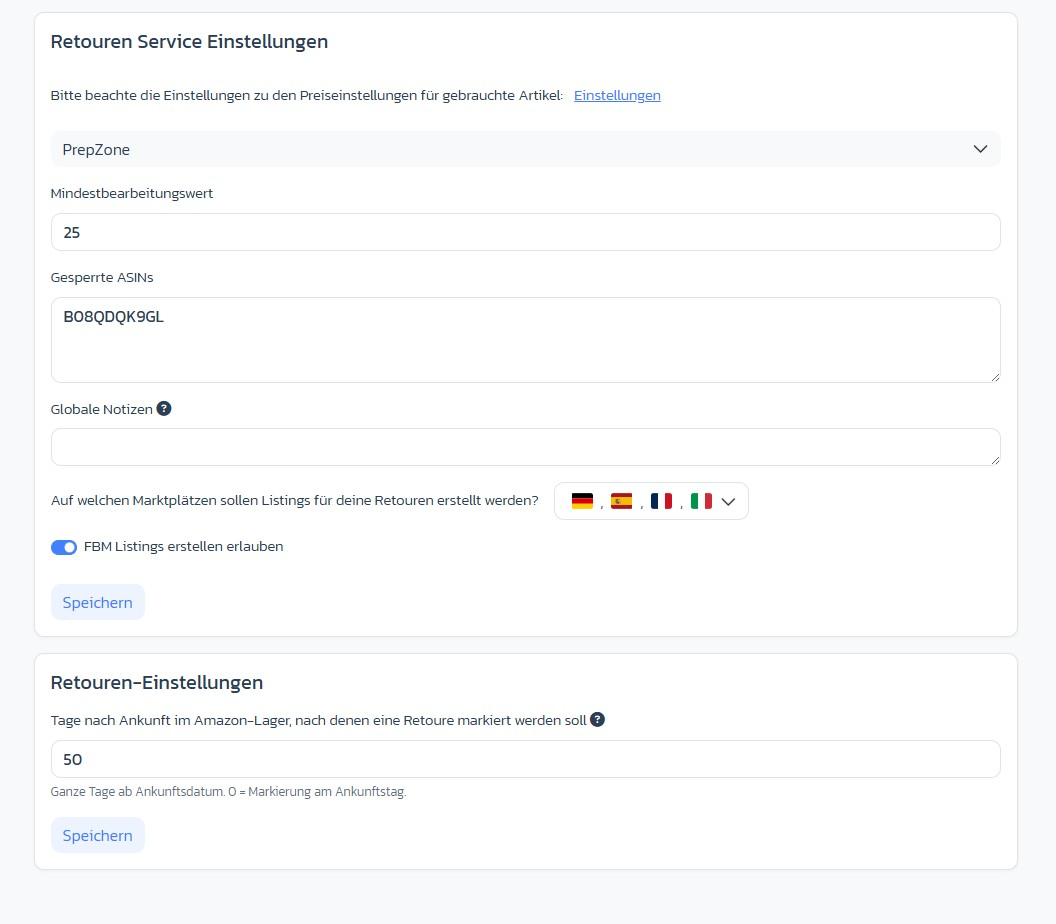
3. Returns settings
→ Open directly in the app: app.arbitrageone.de/returns/settings Under Returns settings there are two separate cards: Returns service settings (per solution provider):- Provider selection — dropdown with all connected providers
- Minimum processing value (€) — anything below is not processed
- Blocked ASINs — excluded from processing
- Global notes — apply to all return documents from this provider
- Marketplaces for listings — multi-select with country flags
- Allow creating FBM listings — toggle
- Days after arrival at the Amazon warehouse before a return is flagged — default 50, 0 = immediately on arrival
Step-by-step: Process a return
Step 1: Find the return
Go to Returns and filter via the In progress tab or search at the top right for the LPN printed on the return.Step 2 (optional): Create a task
Click Create task, choose the appropriate type (e.g. Send photos, Open Amazon case) and upload images or the serial number if needed.Step 3: Create listing
Once the return has been checked and deemed resellable, click Create listings. The return gets a new dedicated SKU by default — please keep it that way, since a dedicated SKU is important for the profit calculation of the return.Step 4: Finalize processing
Once the item is checked, set the todo to Done. For resellable items, ArbitrageOne automatically creates a new listing in the configured marketplaces.Important notes
- The LPN is the key for uniquely identifying a return.
- Settings like “Minimum processing value” and “Blocked ASINs” are for processing by prep centers — you don’t see this in the dashboard.
- Only returns that have already arrived at the Amazon warehouse are shown.
- Resellable returns can be shown via the filters but are hidden by default.