Short description
The marketplace page is your central dashboard for connecting all external services to ArbitrageOne: Amazon Seller Central, Prep Center, returns service, Google Sheets, deal finders and notification channels.Step-by-step guide
Step 1: Open the marketplace overview
→ Open directly in the app: app.arbitrageone.de/apiconnections In the main menu under Settings → API connections you’ll see a grid of all available services, grouped by category: Amazon, Prep Center and more.Step 2: Connect Amazon Seller Central
Under API connections you’ll find the Amazon card. Click Authorize to connect your Seller account via SP-API. → Detailed guide: How do I connect my Amazon account to ArbitrageOne?ℹ Note: An Amazon Seller Account (Seller Central — for selling) is not the same as an Amazon Business Account (B2B purchasing on Amazon Business). Both are connected via separate cards under API connections.
Step 3: Configure marketplaces and Amazon programs
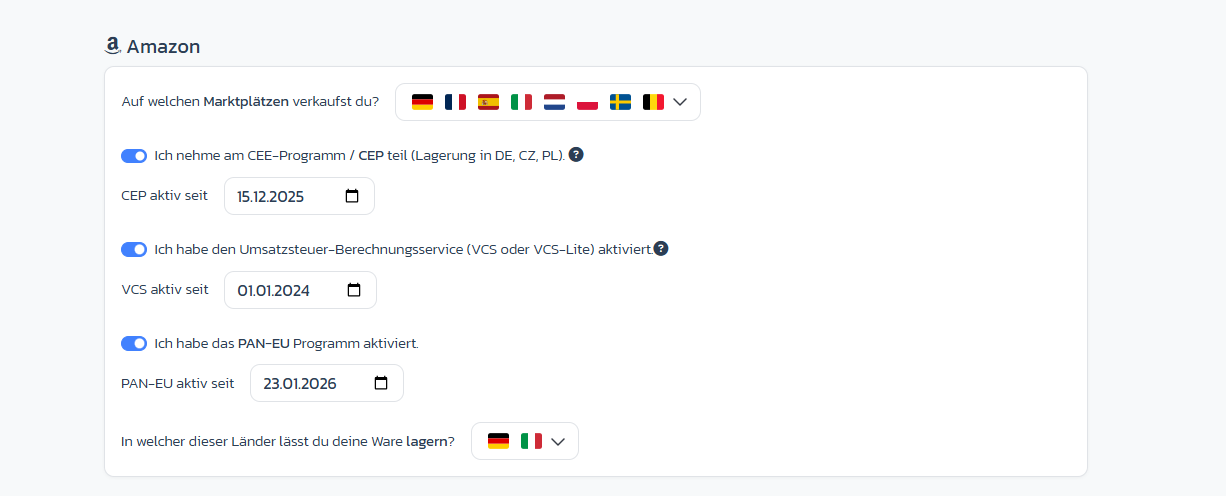
→ Open directly in the app: app.arbitrageone.de/marketplace On the Amazon card you define which marketplaces you sell on (DE, FR, ES, IT, NL, PL, SE, BE …) and which Amazon programs you use. For each program you record the activation date, so that fees and calculations run correctly retroactively:- CEE program / CEP (storage in DE, CZ, PL) — toggle + date field CEP active since
- VAT Calculation Service (VCS or VCS-Lite) — toggle + date field VCS active since
- PAN-EU program — toggle + date field PAN-EU active since
- Storage countries: “In which of these countries do you allow your goods to be stored?” — multi-select via the flags
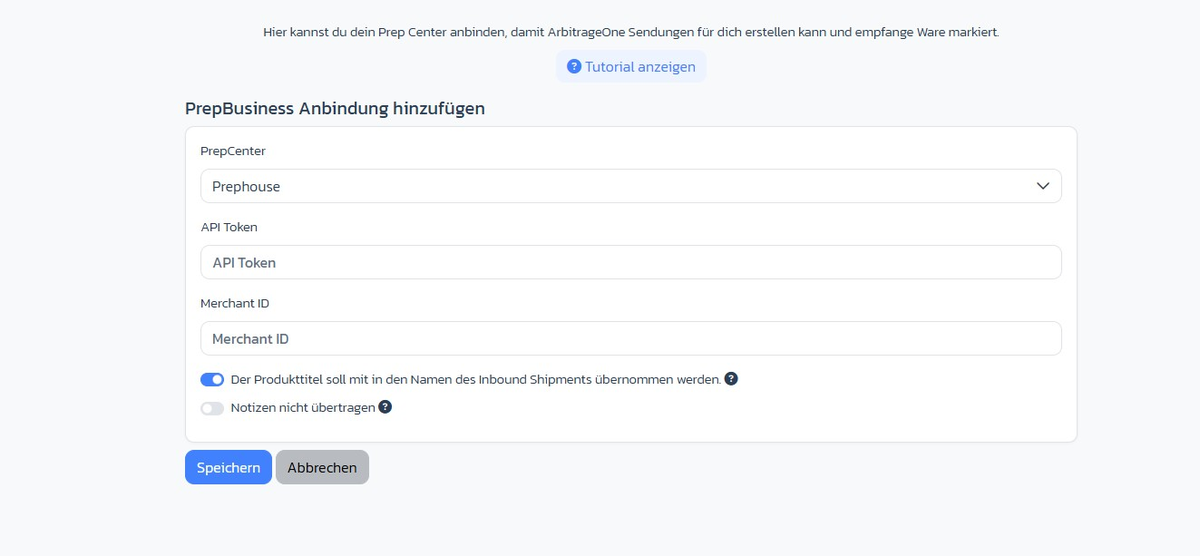
Step 4: Add Prep Center (optional)
Under Prep Center you click Add Prep Center. The Add PrepBusiness connection form opens:- Prep Center — select provider (e.g. Prephouse)
- API Token — from your Prep Center
- Merchant ID — from your Prep Center
- Include product title in the name of the inbound shipment — toggle (default on), helps the Prep Center with assignment
- Don’t transfer notes — toggle, if you don’t want internal sourcing notes sent to the Prep Center
Step 5: Connect returns service (optional)
Under Marketplace you see your connected returns provider. To connect a new one, you’ll receive a link from your provider/Prep Center.Step 6: Set up notifications
Under API connections you connect Discord webhooks or email channels through which ArbitrageOne notifies you about important events.Important notes
- The status of each service is indicated by a coloured dot: green = connected, red = connection error, grey = not yet set up.
- Use the search field at the top to filter cards in real time.
- Edit services via the edit icon or disconnect them via the trash icon (with confirmation).